As an Amazon Associate, I earn from qualifying purchases
To make scented candles with perfume, melt the wax, add perfume, and pour into molds with a wick. Let it cool and solidify.
Creating scented candles with your favorite perfume is a delightful and easy DIY project. This activity not only lets you customize the fragrance but also adds a personal touch to your home décor. Scented candles can enhance the ambiance of any room, making it more inviting and relaxing.
Crafting your own candles allows you to experiment with various scents, ensuring you achieve the perfect aroma. Plus, handmade candles can be a thoughtful and personalized gift for friends and family. Follow these simple steps to make your own scented candles and enjoy the soothing and aromatic benefits they offer.
Introduction To Scented Candles
Scented candles can transform any space. They create a cozy and inviting atmosphere. Using perfume to make scented candles is a great idea. It allows you to customize the fragrance to your liking.
Scented candles are easy to make at home. With the right ingredients, you can create beautiful and aromatic candles.
Benefits Of Scented Candles
Scented candles offer many benefits. Here are a few:
- Relaxation: Certain scents can help you relax.
- Improved Mood: Pleasant smells can lift your spirits.
- Aromatherapy: Essential oils in candles can have health benefits.
Choosing The Right Fragrance
Choosing the right fragrance is crucial. It sets the mood for your space.
Here are some tips to choose the best fragrance:
- Consider the Season: Use fresh scents in summer and warm scents in winter.
- Think About the Room: Use calming scents in bedrooms and energizing scents in living rooms.
- Personal Preference: Choose a scent you love. It will make your space feel more personal.
Table Of Popular Scents
| Season | Scents |
|---|---|
| Spring | Lavender, Jasmine, Rose |
| Summer | Citrus, Coconut, Mint |
| Autumn | Vanilla, Cinnamon, Pumpkin Spice |
| Winter | Pine, Peppermint, Gingerbread |
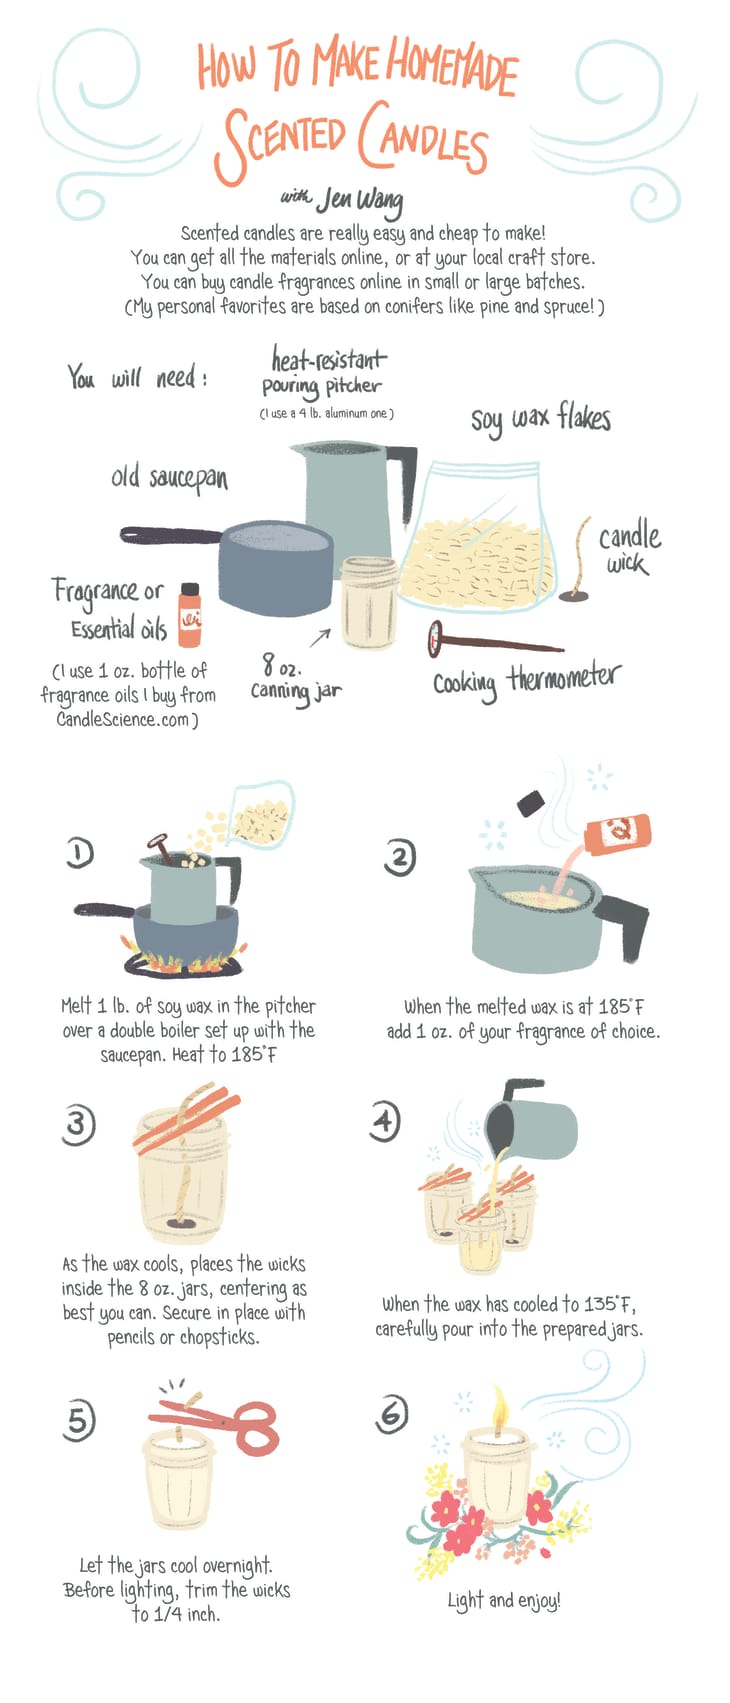
Essential Materials
Creating scented candles at home is fun. You need the right materials. This guide covers the basics to get you started.
Wax Types
Choosing the right wax is crucial. Different waxes have different properties. Here are some common wax types:
| Wax Type | Characteristics |
|---|---|
| Paraffin Wax | Affordable and widely available. Burns well and holds scent. |
| Soy Wax | Natural and eco-friendly. Burns cleaner and longer. |
| Beeswax | Natural and has a mild honey scent. Burns slowly. |
| Coconut Wax | Natural and sustainable. Holds scent well. |
Wicks And Containers
The wick and container impact how your candle burns. Here’s what you need to know:
- Cotton Wicks: Common and effective. Provides a steady burn.
- Wooden Wicks: Creates a crackling sound. Adds a rustic feel.
- Metal-Core Wicks: Sturdy and reliable. Ideal for larger candles.
Choose containers that are heat-resistant and safe. Popular choices include:
- Glass Jars: Stylish and heat-resistant. Easy to clean.
- Metal Tins: Durable and portable. Great for travel.
- Ceramic Pots: Elegant and sturdy. Adds a decorative touch.
Safety Precautions
Making scented candles with perfume can be a fun and creative activity. But safety is paramount. Follow these safety precautions to ensure a safe and enjoyable experience.
Handling Hot Wax
Hot wax can cause severe burns if not handled properly. Always use a double boiler to melt the wax. Never heat wax directly on the stove. Direct heat can make the wax overheat and catch fire.
Wear heat-resistant gloves to protect your hands. Use a thermometer to monitor the wax temperature. Keep the wax below 170°F to prevent accidents.
Have a fire extinguisher nearby. In case of a fire, never use water to extinguish it. Water can make the wax splatter and spread the fire. Smother the fire with a lid or use the extinguisher.
Proper Ventilation
Proper ventilation is crucial when making scented candles. Perfume and wax fumes can be harmful if inhaled in large amounts. Work in a well-ventilated area to avoid inhaling these fumes.
Open windows and doors to allow fresh air to circulate. Use a fan to help disperse the fumes more effectively. If possible, work outside or in a garage with ample ventilation.
Consider wearing a mask to further protect yourself from inhaling fumes. This is especially important if you are sensitive to strong scents.
| Safety Measure | Description |
|---|---|
| Double Boiler | Melt wax safely without direct heat. |
| Heat-Resistant Gloves | Protect hands from hot wax. |
| Thermometer | Monitor wax temperature to prevent overheating. |
| Fire Extinguisher | Essential for putting out wax fires. |
| Ventilation | Ensure good air circulation to avoid inhaling fumes. |
| Mask | Protects from inhaling strong scents. |
Preparing Your Workspace
Creating scented candles with perfume is a fun and creative activity. Before you start, it’s important to set up your workspace properly. A well-organized area ensures safety and efficiency. Below are steps on how to prepare your workspace.
Setting Up Equipment
First, gather all the necessary equipment. A clean, flat surface is essential. Ensure you have the following items:
- Double boiler or a heatproof bowl
- Thermometer to monitor wax temperature
- Pouring pot for melted wax
- Stirring utensils like a spatula
- Wick holders or centering devices
Plug in and arrange all electrical equipment safely. Make sure cords are not in the way.
Organizing Materials
Next, gather and organize your materials. Here’s a list to help you:
| Material | Quantity |
|---|---|
| Wax | 1 pound |
| Fragrance Oil | 1 ounce |
| Wicks | 1 per candle |
| Containers | 1 per candle |
| Dye (optional) | As needed |
Lay out all materials within easy reach. This saves time and effort.
Clear any clutter from your workspace. A tidy area prevents accidents and spills.
With your equipment set up and materials organized, you’re ready to start making candles.
Melting The Wax
Melting the wax is a crucial step in making scented candles. Properly melted wax ensures a smooth, even-burning candle. Here, we’ll explore two effective methods to melt wax: the Double Boiler Method and the Microwave Method.
Double Boiler Method
The Double Boiler Method is a safe and efficient way to melt wax. It prevents the wax from overheating and burning.
- Fill a large pot halfway with water.
- Place a smaller pot or a metal bowl inside the large pot.
- Add your wax to the smaller pot or bowl.
- Heat the water on medium heat.
- Stir the wax occasionally to ensure even melting.
Using this method, the wax melts evenly. It also reduces the risk of burning. This method is ideal for beginners.
Microwave Method
The Microwave Method is quick and convenient. It’s perfect for small batches of wax.
- Place the wax in a microwave-safe container.
- Heat the wax in 30-second intervals.
- Stir the wax after each interval.
- Continue heating until the wax is fully melted.
Be cautious with this method. Overheating can cause the wax to burn. Always monitor the wax closely while microwaving.
Both methods have their advantages. Choose the one that suits your needs best. Melting the wax correctly is key to making beautiful scented candles.
Adding Perfume
Adding perfume to your candles can make them smell amazing. Here we will guide you on how to do it properly.
Choosing Perfume
The first step is to choose the right perfume. Not all perfumes work well in candles. Opt for perfumes with a strong scent. This ensures the fragrance is noticeable when the candle burns.
Consider these points when choosing a perfume:
- Quality: High-quality perfumes last longer.
- Ingredients: Avoid perfumes with water content.
- Fragrance: Choose scents you enjoy.
Correct Proportions
Using the right amount of perfume is crucial. Too much can be overwhelming. Too little may not be noticeable.
Follow this guide for proportions:
| Candle Wax | Perfume |
|---|---|
| 1 pound | 1 ounce |
| 2 pounds | 2 ounces |
| 3 pounds | 3 ounces |
Mix the perfume with the melted wax. Stir well to ensure even distribution. Pour the mixture into your mold. Let it cool and set.
Setting The Wick
Creating scented candles with perfume involves several steps. One crucial step is setting the wick. Proper wick placement and stabilization are essential for a well-burning candle.
Wick Placement
First, choose the right wick for your candle size. A thick wick suits large candles, while a thin wick fits small ones. Cut the wick to be about 2 inches taller than your container.
Using a wick sticker, secure the wick to the container’s bottom center. Press firmly to ensure it sticks well. This helps maintain an even burn.
Stabilizing The Wick
Stabilizing the wick ensures it stays upright as the wax hardens. You can use a wick holder or a pencil. Lay the holder across the container’s top, threading the wick through the center.
For a pencil, wrap the wick around it and lay it across the container. This keeps the wick straight and centered. Make sure the wick stands upright and is taut.
Tip: If the wick leans, your candle will burn unevenly.
| Wick Size | Container Size |
|---|---|
| Thick | Large |
| Thin | Small |
- Choose the right wick for your candle size.
- Cut the wick 2 inches taller than the container.
- Secure the wick with a wick sticker.
- Use a wick holder or pencil to stabilize the wick.
- Select the right wick.
- Cut the wick to size.
- Secure the wick with a sticker.
- Stabilize the wick with a holder or pencil.
Credit: www.apartmenttherapy.com
Pouring The Wax
Pouring the wax is a crucial step in making scented candles. This step needs precision and care to ensure a smooth, bubble-free candle. Let’s dive into the techniques and tips to achieve the perfect pour.
Pouring Techniques
- Melt the wax in a double boiler until it reaches 180°F (82°C).
- Remove from heat and let it cool to 140°F (60°C).
- Add your chosen perfume and stir gently for an even scent.
- Slowly pour the wax into your prepared candle containers.
- Fill the containers up to the desired level, leaving room at the top.
Pouring the wax slowly helps in avoiding spills and ensures even distribution. It’s best to use a pouring pot with a spout for better control.
Avoiding Air Bubbles
Air bubbles can ruin the appearance and integrity of your candles. Here are some tips to avoid them:
- Stir the wax gently to minimize bubbles.
- Pour the wax slowly and steadily into the container.
- Tapping the sides of the container can help release trapped air.
- Use a heat gun to remove surface bubbles if they appear.
Remember, patience is key. Rushing can introduce more air into the wax.
Cooling And Curing
Making scented candles with perfume is a fun craft. After pouring the wax, cooling and curing are essential steps. These steps ensure your candles smell great and last long. Let’s dive into the details.
Optimal Cooling Time
Allow the candles to cool slowly. This helps prevent cracks. The cooling time can vary based on the wax type. For most candles, 4 to 6 hours is ideal. Ensure the environment is at room temperature. Avoid placing candles in the fridge. Sudden temperature changes can cause issues.
Curing Process
The curing process is where the magic happens. Curing allows the fragrance to fully develop. After the candles have cooled, let them sit. This period can range from 3 days to 2 weeks. Here is a simple table to guide you:
| Wax Type | Optimal Curing Time |
|---|---|
| Soy Wax | 1-2 weeks |
| Paraffin Wax | 3-5 days |
| Beeswax | 1 week |
During curing, store candles in a cool, dark place. This helps the scent bind with the wax. After curing, your candles will have a strong, lasting fragrance.
Credit: www.youtube.com
Decorating And Packaging
Decorating and packaging your scented candles can make them even more special. Let’s explore how to make your candles stand out with some creative ideas.
Labeling Candles
Labels can add a personal touch to your candles. Use high-quality paper for labels. Choose fonts that match the candle’s theme. Include the scent name on the label. You can also add a short description. This makes the candle feel more unique. Use waterproof labels to avoid smudging. Here are some ideas for labeling:
- Handwritten Labels: Use a calligraphy pen for a vintage look.
- Printed Labels: Design them on a computer and print.
- Stickers: Custom-made stickers can be ordered online.
Gift Packaging Ideas
Packaging can make your candles perfect for gifts. Use a variety of materials to make your candles look appealing. Consider these ideas:
| Material | Idea |
|---|---|
| Boxes | Use decorative boxes with lids. |
| Ribbons | Tie a ribbon around the candle or box. |
| Tags | Attach a small tag with a message. |
| Wrapping Paper | Use colorful or patterned paper. |
Here are some steps to package your candles:
- Choose a box that fits the candle.
- Place the candle inside the box.
- Wrap the box with decorative paper.
- Tie a ribbon around the box.
- Add a tag with a personal note.
Decorating and packaging your scented candles with care can make them truly special. Whether for gifts or personal use, these touches enhance their appeal.
Credit: www.youtube.com
Frequently Asked Questions
What Materials Are Needed For Scented Candles?
You need wax, wicks, perfume, and containers.
Can I Use Any Perfume For Candles?
Use non-alcoholic, oil-based perfumes for best results.
How Much Perfume To Add In Candles?
Add 1 oz of perfume per pound of wax.
What Type Of Wax Is Best?
Soy wax is eco-friendly and burns longer.
How To Melt The Wax Properly?
Use a double boiler to melt wax evenly.
How To Secure The Wick In The Container?
Use a glue dot or wick sticker to hold it.
How Long Should Candles Cure?
Let candles cure for 24 to 48 hours.
Is It Safe To Use Essential Oils?
Yes, ensure they’re candle-safe and non-toxic.
What Containers Are Best For Candles?
Glass jars and metal tins are popular choices.
How To Store Homemade Scented Candles?
Store in a cool, dry place, away from sunlight.
Conclusion
Creating scented candles with perfume is both fun and rewarding. Follow the steps and enjoy your custom scents. Experiment with different perfumes to find your perfect blend. Share your creations with friends and family. Making your own candles can also be a great gift idea.
Happy candle making!
As an Amazon Associate, I earn from qualifying purchases