As an Amazon Associate, I earn from qualifying purchases
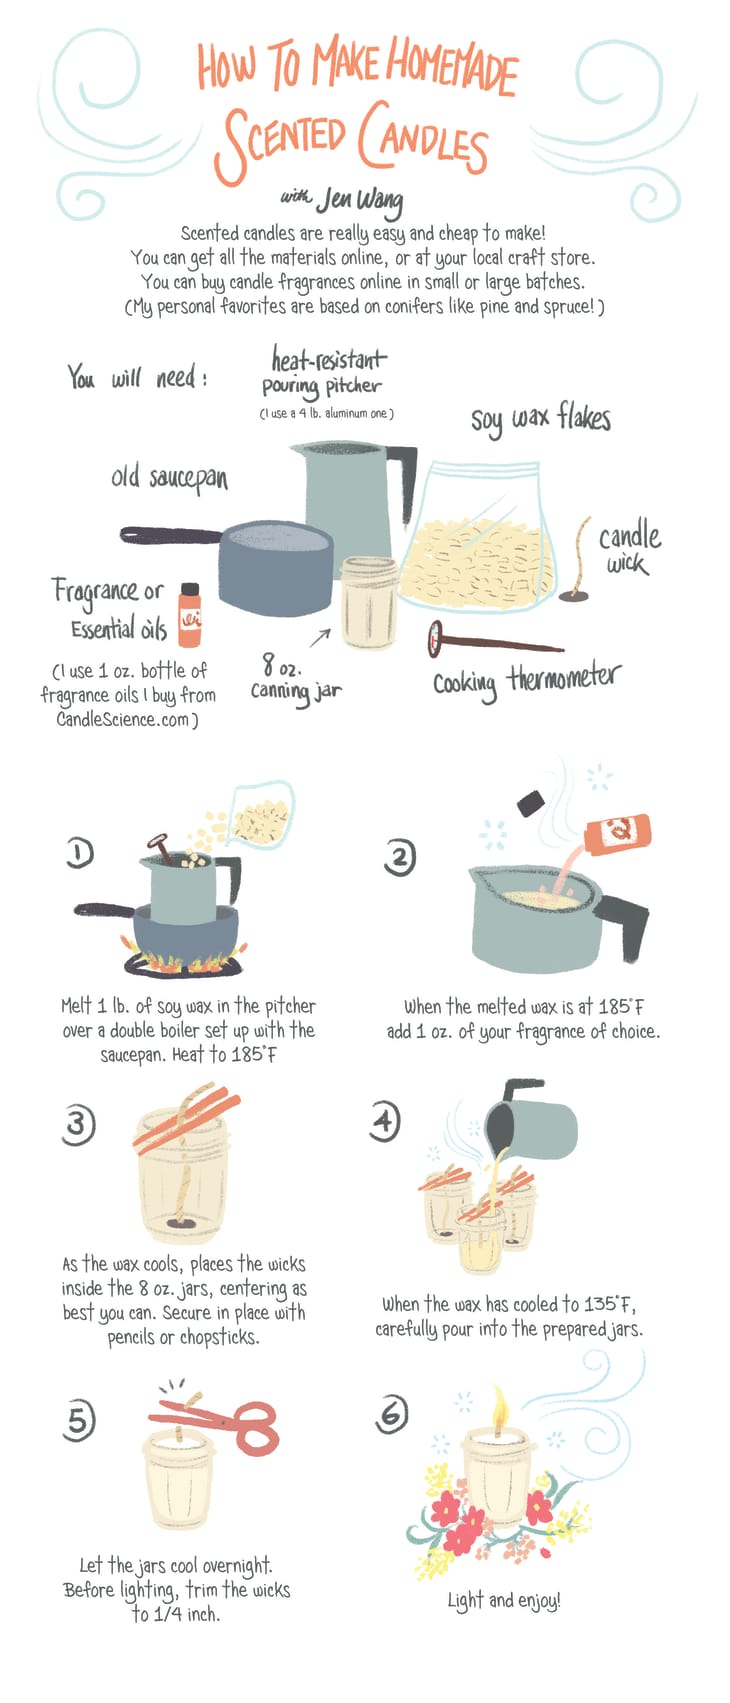
To make fragrance candles at home, melt wax, add fragrance oil, and pour into a container with a wick. Let it cool and solidify.
Creating fragrance candles at home is a rewarding and creative hobby. It allows you to customize scents and colors to your liking. You can use soy wax, beeswax, or paraffin wax. Choose fragrances like lavender, vanilla, or citrus essential oils.
Gather wicks, containers, and a double boiler for melting wax. Ensure you have a thermometer to monitor temperature. Follow safety guidelines, such as working in a well-ventilated area. Making your own candles not only saves money but also provides a personal touch to your home decor. Enjoy the soothing ambiance of your handmade candles.
Introduction To Fragrance Candles
Creating fragrance candles at home is a delightful hobby. It’s a fun way to add personal touches to your space. These candles fill your home with wonderful aromas. Let’s explore the world of fragrance candles.
Benefits Of Diy Candles
- Cost-effective: Making candles is cheaper than buying them.
- Customization: You can choose your own scents and colors.
- Quality Control: Use high-quality ingredients to ensure safety.
- Creative Outlet: This activity boosts your creativity.
- Gift Potential: Handmade candles make thoughtful gifts.
Types Of Fragrance Candles
There are many types of fragrance candles to choose from. Each type has its own charm.
| Type | Description |
|---|---|
| Pillar Candles | These are large, solid candles. They burn for a long time. |
| Container Candles | These candles are poured into jars or tins. They are very safe. |
| Tea Light Candles | These are small and usually come in metal cups. They are great for decoration. |
| Votive Candles | These are small and cylindrical. They are often used in holders. |

Credit: www.apartmenttherapy.com
Gathering Materials
Making fragrance candles at home is a fun and rewarding hobby. The first step is gathering all the necessary materials. This ensures a smooth and enjoyable process. Let’s dive into what you need to get started.
Essential Supplies
To make your own fragrance candles, you will need the following supplies:
- Wax: The base of your candle. Choose wisely.
- Fragrance oils: For adding delightful scents.
- Wicks: These are crucial for burning the candle.
- Containers: Jars or molds to hold your wax.
- Thermometer: To monitor wax temperature.
- Double boiler: For melting the wax safely.
- Stirring stick: To mix the fragrance with wax.
- Labels: For personalizing your candles.
Choosing The Right Wax
Choosing the right wax is crucial for making good candles. Here are some options:
| Type of Wax | Characteristics |
|---|---|
| Soy Wax | Eco-friendly, burns clean and holds fragrance well. |
| Paraffin Wax | Affordable, widely available, but less eco-friendly. |
| Beeswax | Natural, long-burning, and produces a lovely honey scent. |
| Coconut Wax | Eco-friendly, burns clean, and has a great scent throw. |
Pick the wax that suits your needs best. Each type has its unique qualities. Make sure your choice aligns with your preferences and the kind of candle you want to create.
Selecting Fragrances
Selecting the right fragrance is crucial for making candles. The scent sets the mood and ambiance. It can also evoke memories and emotions. Let’s explore how to choose the best fragrances for your homemade candles.
Popular Scents
Popular scents vary based on personal preferences. Here are some top choices:
- Lavender: Known for its calming properties.
- Vanilla: A classic, warm, and inviting aroma.
- Citrus: Fresh and energizing, like lemon or orange.
- Rose: Romantic and floral, perfect for a cozy evening.
- Mint: Refreshing and invigorating, ideal for focus.
Mixing Fragrance Oils
Mixing fragrance oils can create unique scents. Follow these steps for the best results:
- Start with a base note: This is the foundation of your scent. Common base notes include sandalwood and vanilla.
- Add a middle note: These are often floral or spicy. They add complexity to your fragrance. Think lavender or cinnamon.
- Finish with a top note: These are the first scents you smell. Citrus or mint are great choices.
Use a ratio of 1:2:3 for top, middle, and base notes. Test small batches to perfect your blend.
| Fragrance Oil | Type | Properties |
|---|---|---|
| Lavender | Middle | Calming |
| Vanilla | Base | Warm |
| Orange | Top | Energizing |
Remember to record your recipes. This helps you recreate successful blends. Happy candle-making!
Credit: www.apartmenttherapy.com
Preparing Your Workspace
Creating a dedicated workspace for making fragrance candles is essential. This ensures a smooth and safe crafting process. Follow these steps to set up your workspace effectively.
Safety Precautions
- Wear protective gear: Use gloves and safety glasses to protect your skin and eyes.
- Work in a well-ventilated area: Good airflow prevents inhaling harmful fumes.
- Keep a fire extinguisher handy: Be prepared for any accidental fires.
- Clear your workspace: Remove flammable materials from the area.
- Use a heat-resistant surface: Protect your table or counter from hot wax.
Setting Up Your Tools
Gather all necessary tools before you begin. This ensures a smooth workflow.
| Tool | Purpose |
|---|---|
| Double boiler | Melts the wax safely. |
| Thermometer | Monitors wax temperature. |
| Pouring pot | Helps in pouring melted wax. |
| Wick holder | Holds the wick in place. |
| Measuring cups | Measures fragrance oils. |
| Stirring stick | Mixes the wax and fragrance. |
Once your workspace is set up, you are ready to start making your candles. A well-prepared workspace is key to making beautiful and safe fragrance candles at home.
Melting The Wax
Melting the wax is a crucial step in making fragrance candles. The wax needs to be melted safely and evenly. There are two popular methods: the double boiler method and the microwave method.
Double Boiler Method
The double boiler method is a safe way to melt wax. It involves using two pots. Follow these steps:
- Fill the bottom pot with water.
- Place the second pot on top.
- Add wax to the top pot.
- Heat the water on low.
- Stir the wax as it melts.
This method ensures even melting and prevents the burning of the wax.
Microwave Method
The microwave method is quick and easy. Use a microwave-safe container. Follow these steps:
- Place wax in the container.
- Heat on high for 1 minute.
- Stir and check the consistency.
- Repeat until fully melted.
This method is faster but requires caution to avoid overheating.
Credit: www.youtube.com
Adding Fragrance And Color
Creating fragrance candles at home is a fun and rewarding hobby. The magic happens when you add fragrance and color. This step allows you to customize your candles, making them unique.
Measuring Oils
For a perfect scent, use the right amount of fragrance oil. Typically, add 1 ounce of oil per pound of wax. This ratio ensures the candle smells great without overpowering.
Use a digital scale for precise measurements. Pour the oil slowly to avoid spills. Stir the mixture thoroughly to distribute the scent evenly.
Using Dye Blocks And Liquid Dyes
Adding color to your candles can be exciting. Choose between dye blocks and liquid dyes for different effects.
Dye blocks are solid and come in various colors. Cut the block into small pieces and melt them with the wax. This method gives a consistent color throughout the candle.
Liquid dyes are easy to use and blend quickly. Add a few drops of melted wax for a vibrant hue. Stir well to ensure the color spreads evenly.
Here’s a quick comparison:
| Type | Pros | Cons |
|---|---|---|
| Dye Blocks | Consistent color, easy to measure | Requires melting, harder to mix |
| Liquid Dyes | Quick to blend, vibrant colors | Easy to overuse, can be messy |
Choosing the right method depends on your needs. Experiment with both to find your favorite.
Pouring The Wax
Pouring the wax is a crucial step in making fragrance candles at home. Proper techniques ensure your candles are smooth and free of bubbles. Let’s explore the key elements in this process.
Choosing Molds
Choosing the right mold is essential for your candle-making project. There are many types of molds available:
- Silicone Molds: Easy to use and flexible.
- Metal Molds: Durable and good for long-term use.
- Plastic Molds: Affordable but less durable.
Consider the size and shape of the molds. They should match your desired candle design. Always ensure the mold is clean and dry before use.
Pouring Techniques
Proper pouring techniques are vital for quality candles. Here are some tips:
- Heat the wax to the recommended temperature. Follow the instructions on your wax package.
- Pour slowly to avoid air bubbles. Hold the container close to the mold.
- Fill molds almost to the top, leaving a small gap. This prevents overflow when the wax expands.
Use a thermometer to monitor the wax temperature. If it’s too hot, it can cause cracks. If it’s too cold, it may not pour smoothly.
After pouring, allow the wax to cool and set. This takes several hours. Avoid moving the molds during this time. Disturbing them can cause imperfections.
Setting The Wick
Setting the wick is a crucial step in making fragrance candles. A properly placed wick ensures even burning and maximizes scent throw. Let’s dive into the essentials of wick placement and securing the wick.
Wick Placement Tips
Placing the wick correctly is essential for a well-burning candle. Follow these tips to get it right:
- Center the Wick: The wick should be at the exact center of the container. This helps in even burning.
- Use a Wick Holder: A wick holder keeps the wick straight while you pour the wax.
- Measure the Height: Ensure the wick is long enough to stick out of the wax by at least 1/4 inch.
Securing The Wick
Securing the wick prevents it from moving while pouring hot wax. Here are some methods:
| Method | Description |
|---|---|
| Wick Stickers | Place a wick sticker at the bottom of the wick tab. Press it firmly in the center of the container. |
| Hot Glue | Apply a small amount of hot glue to the base of the wick tab. Stick it to the container’s bottom. |
| Double-Sided Tape | Use double-sided tape to secure the wick tab. Ensure it sticks well to the container. |
Once the wick is secured, let it sit for a few minutes. This helps it adhere properly before you pour the wax.
Cooling And Curing
Cooling and curing are crucial steps in candle making. These steps ensure your candles set properly. They also maintain their scent and appearance. Follow these guidelines for perfect candles every time.
Cooling Time
Allow the candles to cool slowly. This helps prevent cracks. Place the molds on a heat-resistant surface. Ensure the room is at room temperature. Avoid drafts and direct sunlight. Let the candles cool for at least 4 hours.
| Cooling Time | Temperature |
|---|---|
| 4 Hours | Room Temperature |
Removing From Molds
After cooling, carefully remove the candles from the molds. Gently tap the molds to loosen the candles. If needed, place the molds in the freezer for 10 minutes. This helps release the candles easily.
- Ensure the candles are completely cool.
- Tap the molds gently to loosen.
- Use the freezer trick for stubborn molds.
Once removed, trim the wicks to 1/4 inch. This prepares the candles for the curing process. Place the candles in a cool, dark place for curing.
- Trim the wicks to 1/4 inch.
- Store in a cool, dark place.
- Cure for at least 48 hours.
Curing allows the wax and fragrance to blend well. This ensures a stronger scent throw when burned.
Decorating And Packaging
Decorating and packaging your homemade fragrance candles is a fun task. A well-decorated candle can make a lovely gift or a nice addition to your home decor. This section will guide you through the steps of labeling, gift wrapping, and packaging your candles beautifully.
Labeling Candles
Creating labels for your candles adds a personal touch. Use waterproof sticker paper for durability. Design your label with bold fonts and clear information. Include the candle’s scent, your brand name, and any safety warnings.
- Print your design on sticker paper
- Cut out each label carefully
- Stick the labels on the candle jars
For a professional look, use a template for your labels. You can find many free templates online. If you prefer, you can also handwrite the labels for a rustic feel.
Gift Wrapping Ideas
Gift wrapping your candles makes them extra special. Choose decorative paper that matches the candle’s scent.
- Wrap the candle jar in tissue paper
- Place the wrapped candle in a small box
- Tie the box with a ribbon or twine
Add a handwritten note for a personal touch. You can also use gift bags for easy wrapping. Decorate the gift bag with stickers or stamps.
| Wrapping Material | Purpose |
|---|---|
| Tissue Paper | Wrap the candle jar |
| Small Box | Contain the wrapped candle |
| Ribbon or Twine | Tie the box |
| Gift Bag | Alternative wrapping option |
Using these simple steps, your candles will look professional and gift-ready!
Frequently Asked Questions
What Materials Are Needed For Making Candles?
You’ll need wax, fragrance oils, wicks, containers, and a double boiler.
How To Choose The Right Wax?
Choose wax based on burn time and scent throw, like soy or beeswax.
Can I Use Essential Oils In Candles?
Yes, essential oils are great for natural, fragrant candles.
How Long Should The Wick Be?
The wick should be 1 inch taller than the container’s height.
How To Melt The Wax Safely?
Melt wax using a double boiler to avoid direct heat.
How Much Fragrance Oil To Use?
Use 1 ounce of fragrance oil per pound of wax for a strong scent.
Can I Reuse Old Candle Jars?
Yes, clean and dry old jars thoroughly before reusing them.
How To Prevent Candle Tunneling?
Use the correct wick size and let the candle burn to the edge.
What’s The Best Way To Cool Candles?
Let candles cool at room temperature, away from drafts.
How To Store Homemade Candles?
Store candles in a cool, dark place to preserve fragrance.
Conclusion
Creating fragrance candles at home is a fun and rewarding experience. You can customize scents and designs easily. With these tips, you’re ready to start making your candles. Enjoy the process and the delightful aromas that fill your space.
Happy candle-making!
As an Amazon Associate, I earn from qualifying purchases