As an Amazon Associate, I earn from qualifying purchases
To make wax for candles from scratch, melt beeswax or paraffin wax and add essential oils for fragrance. Pour into molds to set.
Creating homemade candles is a rewarding and creative hobby. Knowing how to make wax from scratch ensures you control the quality and ingredients. Start by selecting your base wax, either beeswax or paraffin. Beeswax is natural and eco-friendly, while paraffin is more affordable and widely available.
Melt the wax in a double boiler to prevent burning. Once melted, you can add essential oils for a pleasing scent. Stir thoroughly to mix the fragrance evenly. Pour the hot wax into molds or containers and let it cool and harden. Your homemade candles are now ready to light and enjoy.
Introduction To Candle Making
Creating your own candles at home is a fun and rewarding hobby. Candle-making lets you express your creativity and craft something beautiful. Whether you’re a beginner or a seasoned crafter, making candles from scratch can be enjoyable and relaxing.
The Joy Of Diy Candles
Making your own candles offers a unique sense of accomplishment. You can customize colors, scents, and shapes to your liking. DIY candles make wonderful gifts for friends and family. Plus, they add a personal touch to your home decor. Watching your handmade candles burn can bring a sense of peace and satisfaction.
Benefits Of Making Your Own
Creating your own candles has several benefits:
- Cost-Effective: Homemade candles are cheaper than store-bought ones.
- Customizable: You can choose the ingredients and fragrances.
- Eco-Friendly: Use natural waxes and avoid harmful chemicals.
- Therapeutic: Candle making is a calming and stress-relieving activity.
Here is a simple comparison to show the benefits:
| Store-Bought Candles | Homemade Candles |
|---|---|
| Limited choices | Unlimited customization |
| Expensive | Cost-effective |
| May contain chemicals | All-natural options |
Making candles from scratch is a fulfilling experience. It allows you to create something truly unique. Embrace the joy and benefits of DIY candles today!
Essential Materials
Creating your own candles from scratch is a rewarding experience. Before you start, you need the right materials. This section covers the essential materials required for making wax for candles. We’ll break down the types of wax and the necessary tools you need. Let’s dive in!
Types Of Wax
Choosing the right wax is crucial for your candle-making process. Here are the main types of wax:
- Paraffin Wax: This is the most common type. It’s affordable and easy to use.
- Soy Wax: Made from soybeans, this wax is eco-friendly and burns cleaner.
- Beeswax: A natural option with a pleasant honey scent. It burns longer than other waxes.
- Palm Wax: Derived from palm oil, it creates unique crystal patterns as it cools.
Necessary Tools
Having the right tools makes the process smoother. Here’s a list of necessary tools:
| Tool | Description |
|---|---|
| Double Boiler | Used to melt wax safely. |
| Thermometer | Ensures the wax is at the right temperature. |
| Pouring Pot | Makes it easier to pour melted wax into molds. |
| Wicks | Essential for burning the candle. |
| Molds | Shape the candles as they cool. |
| Mixing Spoon | Used to stir the wax and any additives. |
With these materials and tools, you’re ready to start making candles. Gather your supplies and follow the steps carefully for the best results.
Choosing The Right Wax
Selecting the right wax is crucial for making high-quality candles. Different waxes have unique properties. These affect the candle’s burn time, scent throw, and overall appearance. This section will help you understand various types of waxes.
Paraffin Vs. Soy
Paraffin wax is a popular choice for candle-making. It is derived from petroleum. Its key benefits include:
- Low cost
- Wide availability
- Strong scent throw
Soy wax is another common choice. It is made from soybean oil. Its benefits include:
- Natural and renewable
- Longer burn time
- Cleaner burn
Soy wax is also biodegradable. This makes it an eco-friendly option.
Natural Waxes
Natural waxes are gaining popularity. They are made from natural sources. Common types include:
| Wax Type | Source | Benefits |
|---|---|---|
| Beeswax | Honeybees | Long-lasting, natural honey scent |
| Palm Wax | Palm oil | Hard texture, crystallized appearance |
| Coconut Wax | Coconut oil | Slow burn, excellent scent throw |
Beeswax has a natural honey scent. It burns longer and cleaner than other waxes.
Palm wax creates candles with a unique, crystallized look. It is hard and durable.
Coconut wax is soft and creamy. It has a slow burn and great scent throw.
Preparing Your Workspace
Before you start making wax for candles, you need to prepare your workspace. This step is crucial for ensuring a smooth and safe process. A well-organized workspace helps you avoid accidents and makes the candle-making process enjoyable. Follow these steps to set up your workspace effectively.
Safety Precautions
Safety should always be your top priority. Candle-making involves hot wax and open flames. Here are some important safety precautions to follow:
- Keep a fire extinguisher nearby.
- Work in a well-ventilated area.
- Wear heat-resistant gloves and safety goggles.
- Have a first aid kit on hand.
- Keep children and pets away from the workspace.
Organizing Tools And Ingredients
Having everything in place makes the process smoother. Here’s a list of tools and ingredients you need:
| Tools | Ingredients |
|---|---|
| Double boiler | Wax (soy, beeswax, or paraffin) |
| Thermometer | Fragrance oils |
| Stirring spoon | Color dyes |
| Candle molds | Wicks |
| Scale | Wick holders |
Arrange these tools and ingredients on a clean, flat surface. This helps you access everything easily and keeps the workspace tidy.
Label your ingredients clearly. This prevents any mix-ups during the process.
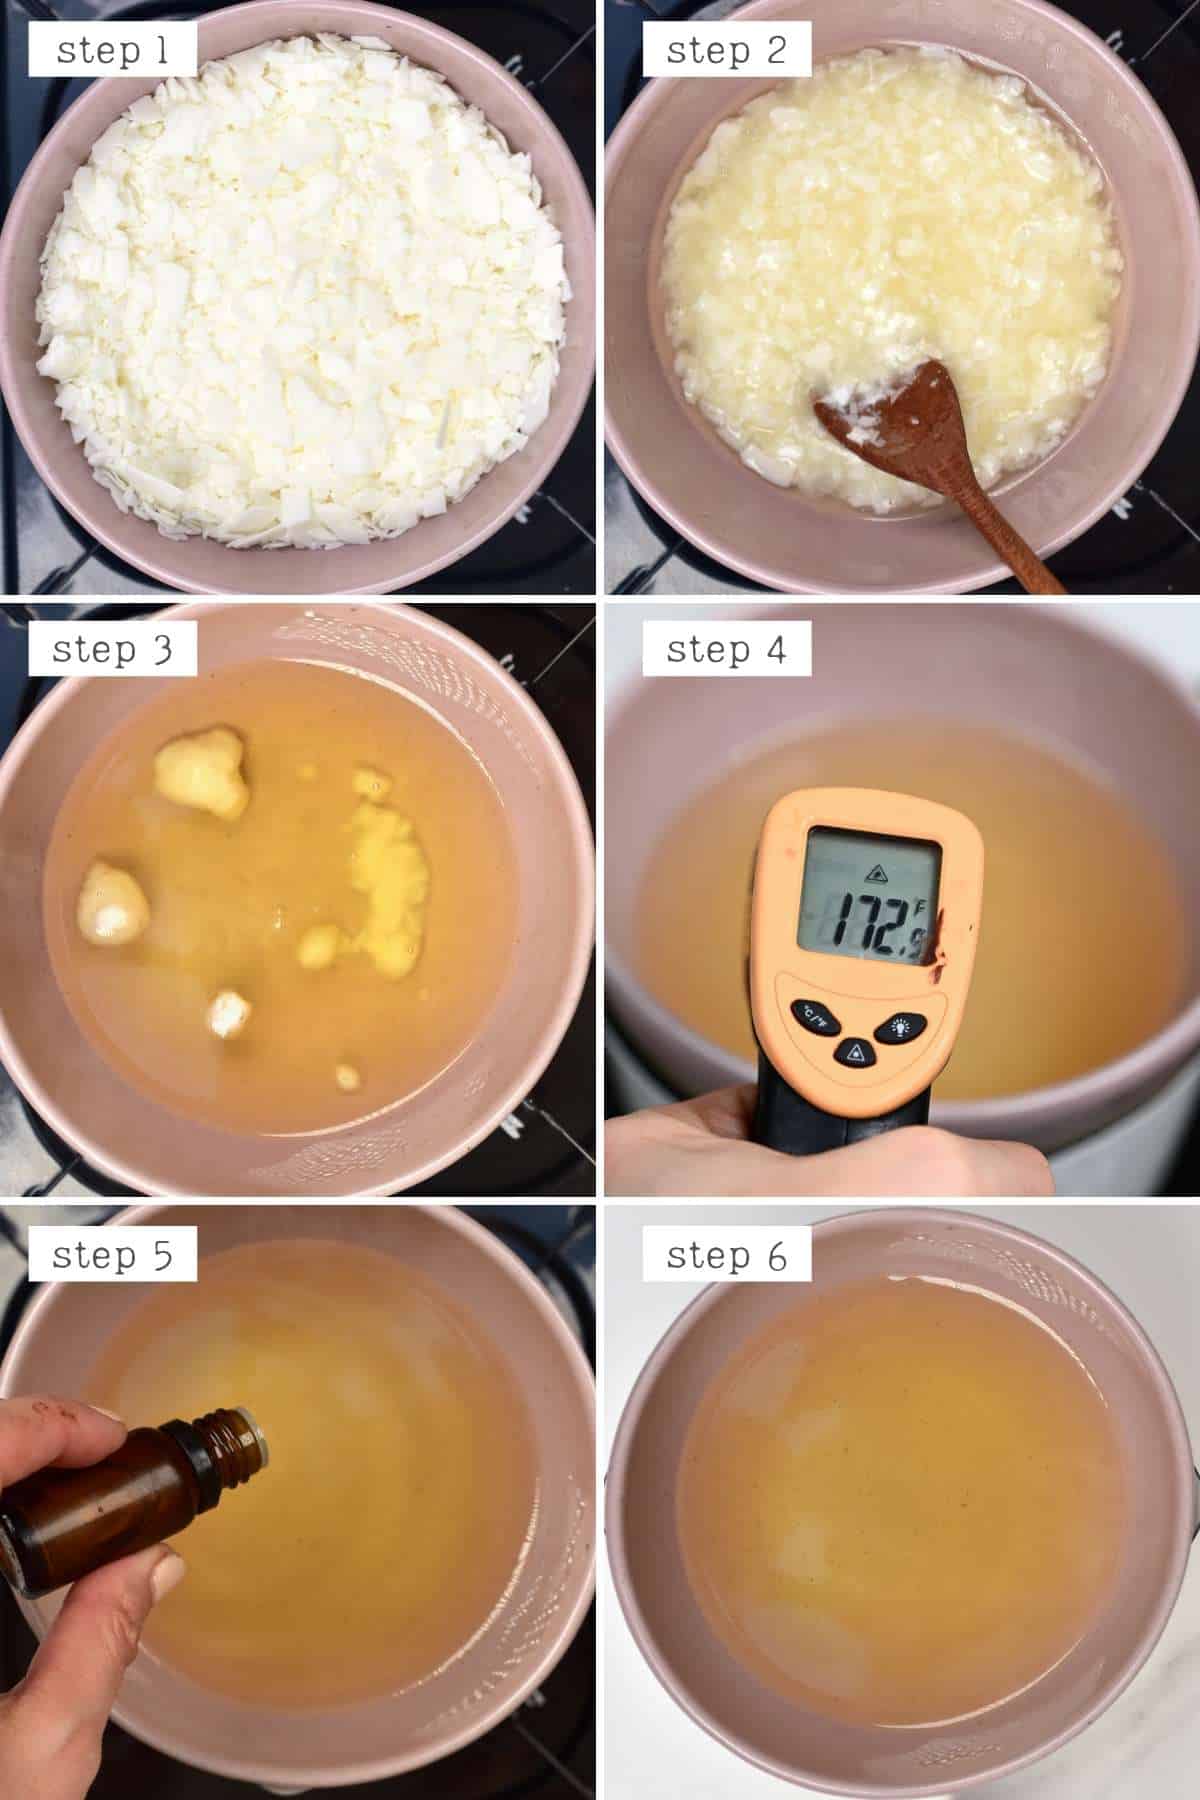
Melting The Wax
Melting the wax is a crucial step in making candles. You need to heat the wax properly to get the best results. There are two main methods to melt wax: the double boiler method and the microwave method.
Double Boiler Method
The double boiler method is safe and effective. Follow these steps to melt wax using this method:
- Fill a large pot halfway with water.
- Place a smaller pot inside the large pot.
- Put the wax into the smaller pot.
- Heat the water on medium heat.
- Stir the wax until it melts completely.
Using a double boiler prevents the wax from burning. It also allows for even melting. Always keep an eye on the wax and stir it regularly.
Microwave Method
The microwave method is quicker and more convenient. Follow these steps to melt wax using this method:
- Place the wax in a microwave-safe container.
- Set the microwave to medium power.
- Heat the wax for 1 minute.
- Stir the wax with a wooden stick.
- Repeat heating in 30-second intervals until melted.
Be careful while using the microwave. Always use short heating intervals to avoid overheating the wax. Stirring between intervals helps distribute the heat evenly.
Both methods have their own advantages. Choose the one that suits your needs and resources. Remember, safety comes first. Always handle hot wax with care.
Adding Fragrance And Color
Adding fragrance and color to your homemade candles can make them unique. Essential oils and dye options offer simple ways to enhance your candles. These enhancements elevate the sensory experience of your candles. Below, we explore the best choices for adding fragrance and color.
Essential Oils
Essential oils are a popular choice for adding fragrance. They come in many scents, from lavender to peppermint. Essential oils are natural and provide a strong aroma. Adding them is easy and effective.
- Choose your favorite scent
- Add 10-15 drops per cup of melted wax
- Stir well to mix the oil evenly
| Essential Oil | Fragrance |
|---|---|
| Lavender | Calming and Floral |
| Peppermint | Fresh and Minty |
| Vanilla | Sweet and Warm |
These oils are easy to find in stores or online. They are a great way to personalize your candles.
Dye Options
Adding color to your candles is just as simple. Candle dyes come in many forms. You can use liquid, blocks, or chips. Each type offers vibrant colors.
- Choose a dye type
- Measure the dye according to the package instructions
- Add it to the melted wax
- Stir until the dye is fully dissolved
Use a small amount at first. You can always add more dye to achieve the desired color.
| Dye Type | Usage |
|---|---|
| Liquid | Easy to mix, vibrant colors |
| Blocks | Long-lasting, easy to store |
| Chips | Convenient, pre-measured portions |
Experiment with different colors to create a unique look. Combining different dyes can make interesting shades.
Pouring The Wax
Pouring the wax is a crucial step in candle making. This step ensures your candles look great and burn well. Follow these simple tips for the best results.
Wick Placement
Proper wick placement is essential for even burning. Start by securing the wick in the center of your container. You can use a wick holder or a pencil to keep it steady. Ensure the wick is straight and not leaning to one side.
Before you pour the wax, double-check the wick’s position. A centered wick helps the candle burn evenly and prevents tunneling.
Avoiding Air Bubbles
Air bubbles can ruin the look of your candle. To avoid them, pour the wax slowly and steadily. This method helps to reduce the chance of air pockets forming.
Another tip is to gently tap the container after pouring the wax. This action helps release trapped air bubbles, ensuring a smooth finish.
If you notice bubbles, use a toothpick to pop them before the wax hardens. This ensures a clean, professional appearance.
Credit: www.alphafoodie.com
Cooling And Setting
The cooling and setting stage is crucial for making candles. Proper cooling ensures a smooth and even finish. This section covers ideal conditions and common troubleshooting tips.
Ideal Cooling Conditions
To achieve the best results, it’s essential to maintain ideal cooling conditions:
- Keep the room temperature between 65°F and 75°F.
- Avoid drafts and sudden temperature changes.
- Use a flat, stable surface for the molds.
- Allow the wax to cool slowly and naturally.
Using these conditions helps prevent cracks and bubbles. Your candles will have a smooth, professional look.
Troubleshooting Common Issues
Even with the best conditions, issues can occur. Here’s how to fix them:
| Issue | Solution |
|---|---|
| Cracks | Lower the room temperature slightly. Re-melt and cool the wax slowly. |
| Bubbles | Stir the wax gently before pouring. Tap the mold lightly to release air. |
| Uneven Surface | Ensure the mold is on a flat surface. Re-melt the top layer and cool again. |
Following these tips helps you achieve perfect candles each time.
Decorating Your Candles
Making candles from scratch is a fun and creative process. Adding unique decorations makes each candle special. Whether you keep them or give them as gifts, personalized touches, and thoughtful wrapping make your candles stand out.
Personalized Touches
Adding personalized touches to your candles makes them unique. Here are some ideas:
- Embedding Flowers: Use dried flowers to add a natural look.
- Adding Colors: Mix different dyes for vibrant candles.
- Using Molds: Create shapes like stars, hearts, or animals.
- Scents: Add essential oils for a pleasant aroma.
Gift Wrapping Ideas
Candles make excellent gifts. Wrapping them beautifully adds a special touch. Here are some gift-wrapping ideas:
- Simple Wrap: Use brown paper and tie it with twine.
- Fabric Wrap: Wrap in colorful fabric and add a ribbon.
- Boxes: Place candles in decorative boxes.
- Labels: Add custom labels with messages or names.
Here is a simple table with ideas and materials needed for wrapping:
| Idea | Materials Needed |
|---|---|
| Simple Wrap | Brown paper, twine |
| Fabric Wrap | Colorful fabric, ribbon |
| Boxes | Decorative boxes, tissue paper |
| Labels | Custom labels, stickers |
Making and decorating candles can be a joyful and creative activity. Adding personalized touches and wrapping them beautifully makes each candle special. Enjoy the process and let your creativity shine!
Candle Care Tips
Crafting your own candles is a rewarding experience. But proper candle care ensures they burn safely and last longer. Here are some essential tips to keep your handmade candles in top shape.
Maximizing Burn Time
To get the most out of your candles, follow these simple guidelines:
- Trim the wick to 1/4 inch before each use. This helps prevent soot and extends burn time.
- Let the candle burn until the wax melts across the entire surface. This avoids tunneling.
- Keep candles away from drafts. Drafts cause uneven burning and reduce burn time.
Safe Usage Practices
Safety is key when enjoying your candles. Follow these practices to ensure a safe environment:
- Never leave a burning candle unattended. Always extinguish before leaving the room.
- Place candles on a stable, heat-resistant surface. This prevents accidents.
- Keep candles away from flammable objects. Ensure they are out of reach of pets and children.
- Use a snuffer to extinguish candles. Blowing them out can cause hot wax to splatter.
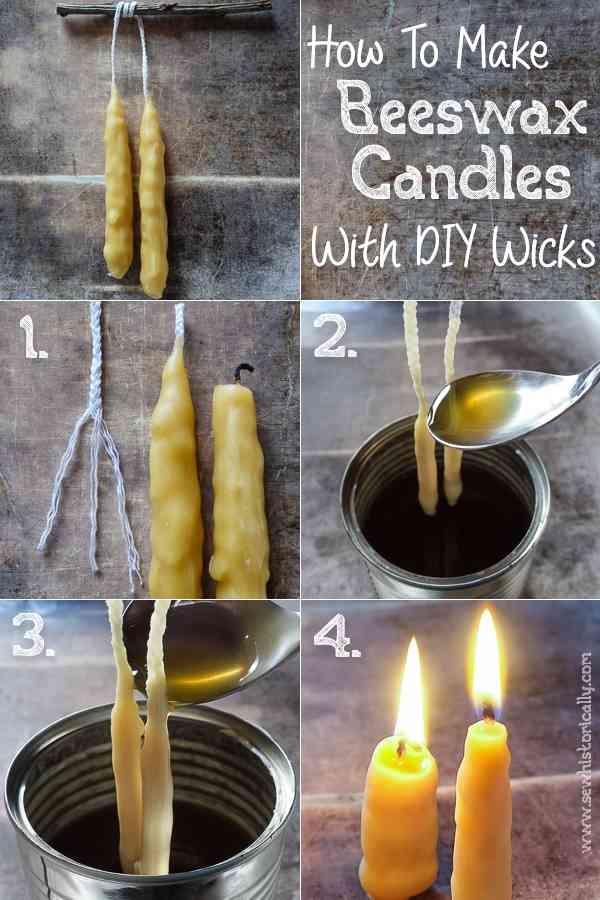
Credit: www.sewhistorically.com
Frequently Asked Questions
How Do You Make Candle Wax From Scratch?
Melt soy wax or beeswax in a double boiler. Add essential oils for scent.
What Materials Are Needed For Candle Wax?
You need soy wax or beeswax, essential oils, and a double boiler.
How Long Does It Take To Make Wax?
It typically takes 20 to 30 minutes to make candle wax.
Can I Use Food Coloring In Wax?
Yes, but use oil-based food coloring for best results.
What Temperature Should Wax Be Melted At?
Melt wax at 170-180°F (77-82°C) for optimal results.
How Much Essential Oil Per Pound Of Wax?
Use about 1 ounce of essential oil per pound of wax.
Is Homemade Candle Wax Safe?
Yes, using natural ingredients like soy wax or beeswax is safe.
Can You Reuse Old Candle Wax?
Yes, you can melt and reuse old candle wax.
How Do You Clean Wax Off Tools?
Use hot water and soap to clean the wax off the tools.
What Wick Size Should I Use?
Choose a wick size based on candle diameter and type of wax.
Conclusion
Crafting your own candle wax is a rewarding and enjoyable process. By following these steps, you’ll create unique candles. Experiment with different ingredients and molds for variety. Making wax from scratch allows for creativity and personalization. Start your candle-making journey today and illuminate your space with handmade creations.
As an Amazon Associate, I earn from qualifying purchases